
If a tankless water heater is not taken care of properly, it can mount up minerals which will form up and block the walls inside the tank’s heating area. You must flush and remove those minerals to keep your heater clean and running. You must do it at least once in every year.
Here’s the things you will need for cleaning process:
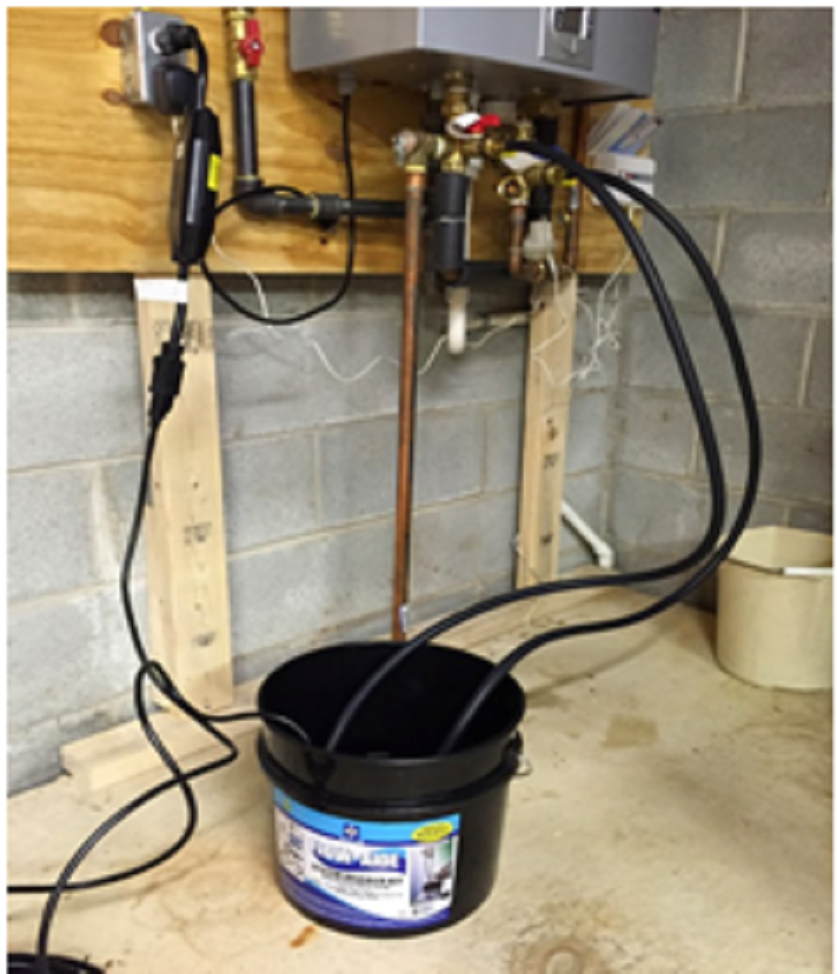
- Pond pump or small sump pump
- Non-contact electrical tester
- Adjustable wrench
- Screwdriver
- 2 sections of garden hose with connectors, 6-foot-long
- Container or bucket, 5-gallon
- 5 gallons of white vinegar
Cleaning Process:
A tankless water heater can be cleaned by following these simple instructions:
- Power: Shut down the main gas/circuit breaker.
- Turn off the water valves: Use the three valves (blue-cold water, red- hot water, other- water flow into house) tostop the flow of water into the heater.
- Remove the purge port valve caps: Remove the “T” shaped purge valve to get rid of any compressed force harming your skin.The rubber washer sealing discs are needed for your valves to function properly.So make sure they don’t fall off while removing the valve.
- Hose Connection: Attach one side of a 6-foot garden hose to the opening of a pump, then attach the other side of the hose to the cold-water isolation valve. Attach a second garden hose to the hot-water isolation valve. Make sure the garden hose couplers are tightened up (use an adjustable wrench).
- Use vinegar: Place the pump and the open side of the second hose into a 5-gallon container. Fill the container with 5 gallons of fresh white vinegar.
- Cleaning the heater: Open the hot and cold isolation valves on the water heater, and turn on the pump in the 5-gallon bucket to circulate the vinegar through the heater. Wait for 45 minutes, then shut down the pump and wait for the vinegar to drain from the water heater. Nowclose the cold-water isolation valve.
- Clear remaining vinegar: Drop the vinegar from the bucket, then leave the open-sided hose back in the bucket. Turn on the cold-water supply valve and let the water flow into the bucket and wait five minutes. Turn off the cold-water supply valve and detach the garden hoses from the inlet valves.
- Clean the inlet filter screen: Shut down the hot-water isolation valve andremove the inlet filter screen per the manual given along with the heater. Wash the screen to remove any residue. Reattach the screen.
- Make sure that there’s no air in the lines: Open the hot water valve after opening the cold water valve. Open a couple of hot-water faucets in the house to get rid of any remaining air from the hot-water lines. When there is no air in the lines, close the faucets.
- Restarting Heater: Make sure there are no leakages by examining the water heater’s connections. Turn on the gas/circuit breaker for the water heater.
If all of these instructions are followed properly, your heater will be ready for use.
Caution:
Please make sure the power is turned off before you start to flush your heater. Your heater could be powered by more than one power source, that’s why you need to ensure power is off by using a non-contact electric tester. If your heater is powered on while the flushing process is in process, you might damage your unit.