
Android developers India have intended this post to outline major facts about Recyclerview, Butter Knife, and CardView. Read this article and find what they are telling about these products.
RecyclerView is version of ListView but with more flexibility used for rendering large set of data in views which can be scrolled and recycled very efficiently.
CardView is a new widget and used for showing information inside card maintaining consistent look across platform. It is basically a container in which we can place other widgets.
Android Butter Knife is an open source injection and reduction library created by Jake Wharton. Using this library user can concentrate on main functionality of application and reduce writing boring redundant code of initializing views, defining event listeners etc.
For configuring Butter Knife in Android project you need to change project level and application level build.gradle files.
- In project level Build.gradle add below line in dependencies section
classpath‘com.neenbedankt.gradle.plugins:android-apt:1.8‘ - In application level build.gradle
- Add below two lines in dependencies section
compile ‘com.jakewharton:butterknife:8.1.0‘
apt ‘com.jakewharton:butterknife-compiler:8.1.0‘ - On top of build.gradle add
apply plugin: ‘android-apt’
- Add below two lines in dependencies section
For RecyclerView and CardView modify application level build.gradle file and add
- compile ‘com.android.support:cardview-v7:23.3.0’
- compile ‘com.android.support:recyclerview-v7:23.3.0’
Finally sync gradle files and you are done with the required steps for configuring Butter Knife library with your project.
Lets go step by step now on for better understanding and easy implementation.
1. Create a layout with RecyclerView for our activity name it activity_main.xml
<?xml version="1.0" encoding="utf-8"?>

<RelativeLayoutxmlns:android="http://schemas.android.com/apk/res/android" xmlns:tools="http://schemas.android.com/tools" android:layout_width="match_parent" android:layout_height="match_parent" android:paddingBottom="@dimen/activity_vertical_margin" android:paddingLeft="@dimen/activity_horizontal_margin" android:paddingRight="@dimen/activity_horizontal_margin" android:paddingTop="@dimen/activity_vertical_margin" tools:context="com.aegisisc.butterknifedemo.MainActivity">
2. Create a layout with CardView for our RecyclerView item, name it row_layout.xml
<?xmlversion="1.0" encoding="utf-8"?>
3. Create a Java Bean Class named Data.java for holding the information to be displayed in RecyclerView items.
public class Data {

privateString title;

privateintimageId;

privateString gender;

privateString maritalStatus;

privatebooleanselected;

publicData(String title, intimageId, String gender, String maritalStatus) {

this.title= title;

this.imageId= imageId;

this.gender= gender;

this.maritalStatus= maritalStatus;

}

publicString getGender() {

returngender;

}

publicintgetImageId() {

returnimageId;

}

publicString getMaritalStatus() {

returnmaritalStatus;

}

publicString getTitle() {

returntitle;

}

publicbooleanisSelected() {

returnselected;

}

public void setSelected(booleanselected) {

this.selected= selected;

}

}
4. Now create a View Holder Class required for RecyclerView.Adapter name it View_Holder.java
public class View_Holderextends RecyclerView.ViewHolder {

@BindView(R.id.cardView)

CardViewcv;

@BindView(R.id.title)

TextViewtitle;

@BindView(R.id.imageView)

ImageViewimageView;

@BindView(R.id.marital_status)

TextViewmaritalStatus;

@BindView(R.id.gender)

TextViewgender;

@BindView(R.id.chkSelect)

CheckBoxchkSelect;

Recycler_View_Adapter.CardViewEventsmCardViewEvents;

View_Holder(View itemView, Recycler_View_Adapter.CardViewEventsmCardViewEvents) {

super(itemView);

this.mCardViewEvents= mCardViewEvents;

ButterKnife.bind(this, itemView);

}

@OnClick(R.id.cardView)

public void cardViewClick(View view){

Data mData = (Data)view.getTag();

if(mCardViewEvents!= null) mCardViewEvents.onClick(mData.getTitle() + " is " + mData.getMaritalStatus() + " " + mData.getGender());

//Toast.makeText(context, , Toast.LENGTH_LONG).show();

}

@OnCheckedChanged(R.id.chkSelect)

public void onCheckChange(CompoundButtoncompoundButton, booleanchecked){

Data mData = (Data)compoundButton.getTag();

if(mData != null &&mData.isSelected() != checked) {

mData.setSelected(checked);

if(mCardViewEvents!= null) mCardViewEvents.onSelectionChange(mData);

}

}

}
Here you see @BindView,@OnClick, @OnCheckedChanged annotation, these are Butter Knife injections. We have Bind our TextViews and Checkbox defined in our row_layout.xml using @BindView annotation and respective OnClick and OnCheckedChanged listeners for CardView and Checkbox using @OnClick and @OnCheckedChanged annotations.
5. Next create Adapter for populating RecyclerView in which we will define an interface with two methods onClick() and onSelectionChange() for handling events, name it View_Adapter.
public class Recycler_View_Adapterextends RecyclerView.Adapter {

Listlist = Collections.emptyList();

Context context;

public interface CardViewEvents{

public void onClick(String message);

public void onSelectionChange(Data data);

}

CardViewEventsmCardViewEvents= new CardViewEvents() {

@Override

public void onClick(String message) {

Toast.makeText(context, message, Toast.LENGTH_LONG).show();

}

@Override

public void onSelectionChange(Data data) {

update(data);

}

};

publicRecycler_View_Adapter(List list, Context context) {

this.list= list;

this.context= context;

}

@Override

publicView_HolderonCreateViewHolder(ViewGroup parent, intviewType) {

//Inflate the layout, initialize the View Holder

View v = LayoutInflater.from(parent.getContext()).inflate(R.layout.row_layout, parent, false);

View_Holder holder = new View_Holder(v, mCardViewEvents);

returnholder;

}

@Override

public void onBindViewHolder(View_Holder holder, intposition) {

Log.d("onBindViewHolder", "Click Position: " + String.valueOf(position));

//Use the provided View Holder on the onCreateViewHolder method to populate the current row on the RecyclerView

holder.title.setText(list.get(position).getTitle());

if(list.get(position).isSelected()){

holder.title.setTypeface(null, Typeface.BOLD);

}else{

holder.title.setTypeface(null, Typeface.NORMAL);

}

holder.imageView.setImageResource(list.get(position).getImageId());

holder.maritalStatus.setText(list.get(position).getMaritalStatus());

holder.gender.setText(list.get(position).getGender());

holder.cv.setTag(list.get(position));

holder.chkSelect.setTag(null);

holder.chkSelect.setChecked(list.get(position).isSelected());

holder.chkSelect.setTag(list.get(position));

}

@Override

publicintgetItemCount() {

//returns the number of elements the RecyclerView will display

returnlist.size();

}

@Override

public void onAttachedToRecyclerView(RecyclerViewrecyclerView) {

super.onAttachedToRecyclerView(recyclerView);

}

// Insert a new item to the RecyclerView on a predefined position

public void insert(intposition, Data data) {

list.add(position, data);

notifyItemInserted(position);

}

// Remove a RecyclerView item containing a specified Data object

public void remove(Data data) {

intposition = list.indexOf(data);

list.remove(position);

notifyItemRemoved(position);

}

public void update(Data data){

intposition = list.indexOf(data);

list.set(position, data);

notifyItemChanged(position);

}

}
Here, inside onBindViewHolder method we will populate the holder views with the information stored in our Data object class instance and also set the same as tag for respective CardView and Checkbox instance to be used inside onClick and onCheckChange method of View_Holder class.
6. Finally add Activity class and set the adapter to RecyclerView, name it MainActivity.java
public class MainActivityextends AppCompatActivity {

@BindView(R.id.recyclerview)

RecyclerViewrecyclerView;


@Override

protected void onCreate(Bundle savedInstanceState) {

super.onCreate(savedInstanceState);

setContentView(R.layout.activity_main);

ButterKnife.bind(this);

List data = new ArrayList<>();

addSampleData(data);

Recycler_View_Adapter adapter = new Recycler_View_Adapter(data, getApplication());

recyclerView.setAdapter(adapter);

recyclerView.setLayoutManager(new LinearLayoutManager(this));

}


private void addSampleData(List data){

data.add(new Data("Person 1",R.drawable.ic_user_male, "Male", "Married"));

data.add(new Data("Person 2",R.drawable.ic_user_female, "Female", "Married"));

data.add(new Data("Person 3",R.drawable.ic_user_female, "Female", "Single"));

data.add(new Data("Person 4",R.drawable.ic_user_male, "Male", "Divorcee"));

data.add(new Data("Person 5",R.drawable.ic_user_male, "Male", "Married"));

data.add(new Data("Person 6",R.drawable.ic_user_male, "Male", "Single"));

data.add(new Data("Person 7",R.drawable.ic_user_female, "Female", "Married"));

data.add(new Data("Person 8",R.drawable.ic_user_male, "Male", "Married"));

data.add(new Data("Person 9",R.drawable.ic_user_female, "Female", "Divorcee"));

data.add(new Data("Person 10",R.drawable.ic_user_female, "Female", "Married"));

}

}
In this we have Bind RecyclerViewusing Butter Knife @BindView annotation. Inside addSampleData we created a sample data list and passed it to RecyclerView Adapter, set this adapter to RecyclerView.
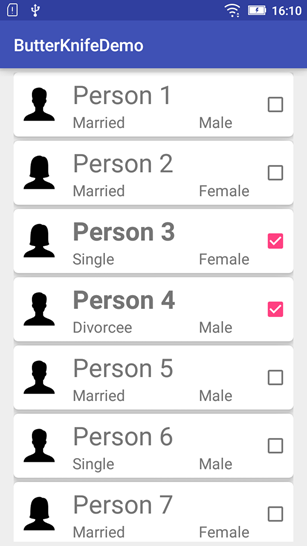
When you run the application, you will be displayed with list of person as displayed in below screen shot.

Comments for this blog are open. You can share your views regarding RecyclerView, CardView, and Butter Knife with other readers. You can even ask anything related to these products from android developers India.
Author Bio:
This article has been written by Rosina De Palma who is a technical writer at Nex Mobility. She is an android developer also. Here she comes with android tutorials for RecyclerView, Cardview and ButterKnife Example.